


Friday, December 18, 2015
A Bead Break: Knit and Crochet Projects
Wednesday, September 23, 2015
Cascade of Pearls
Net Weave, Ladder and Peyote Stitch Bracelet Pattern
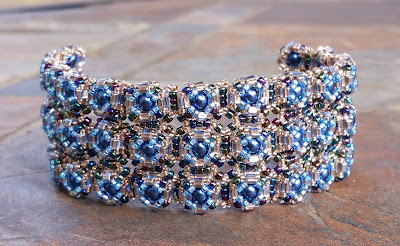
I think next to Tilas and regular seed beads, triangles are my next favorite beads to work with and recently, I've been trying to incorporate them into more pieces. They are fantastic to add some accent color or a little different shape and texture to a piece.
Just a warning on this bracelet: the triangles like to do their own thing, so you may need to adjust them around to get them to lay right. The beads do not sit "perfectly" each time, so each beaded section may turn out a little different.

I have put in parenthesis how I will refer to the beads throughout the pattern.
Materials list for 6 & 1/2" bracelet:
3 g 15/o metallic antique gold seed beads (gold SB 15/o)
3 g 15/o rainbow lined blue seed beads (blue SB 15/o)
5 g 11/o metallic antique gold seed beads (gold SB 11/o)
5 g 11/o metallic blue iris seed beads (iris SB 11/o )
3 g 11/o gold lined Montana blue Toho triangle beads
48 Montana blue 4mm glass pearl
48 Montana blue 4mm glass pearl
Beading needle
sharp, #11 or #12
 Thread 6lb Fireline
or Nymo D. 4lb is fine and may work better in some spots.
Thread 6lb Fireline
or Nymo D. 4lb is fine and may work better in some spots.Clasp- I have not shown directions for adding a clasp in this tutorial.
Saturday, September 12, 2015
Flat Spiral Stitch Bracelet Tutorial
 |
| Flat Spiral Stitch Bracelet |
Vector illustrating has always been a little intimidating to me. Usually, I'm pretty good about figuring things out and researching until I get it, but I couldn't bring myself to do it. Photo editing on GIMP had been enough of a learning curve for me. Taking pictures was just easier, and now that they can be taken, edited and added through my phone, it's made drawing out bead diagrams seem that much more unattractive.
Recently, I decided I would really give vector illustrating an honest try
Tuesday, April 21, 2015
Cleopatra Earrings Beading Tutorial

Peyote and Netting
I thought this would be a great Mother's day gift for those of you who are looking for something quick to make. These were made to match the Cleopatra necklace.This is the first tutorial I have completed in over a year and wanted to try
Saturday, April 18, 2015
Layered Tila Bracelet Beading Tutorial

Right Angle Weave and Netting
This ruby and bronze Layered Tila Bracelet stemmed from my Tila Crystal Box Bracelet Pattern but uses firepolished beads instead of crystals.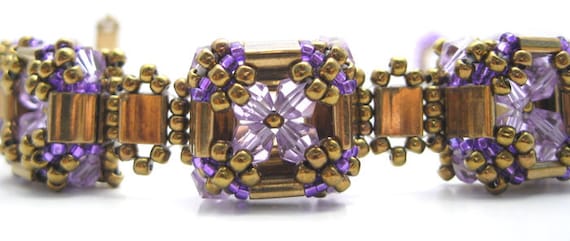 |
| Tila Crystal Box Bracelet on Etsy |
What you will need to make a 7 inch bracelet end to end, 6 and 3/4" wearable:
Monday, April 13, 2015
Cleopatra Necklaces Boxed Up and Ready To Go!

I love Pinterest. Now a days whenever I want to look up how to do something or for new projects, I'll "Pinterest" it. I can pretty much find anything from a new fitness routine, to ideas how to decorate cookies from a particular cutter, or make up and hair styles for date night, organization ideas, kid activities,
Tuesday, March 31, 2015
Alternating Cellini Spiral Bracelet Beadweaving Pattern

Cellini Peyote Spiral Stitch

I made this bracelet for my youngest daughter's teacher a couple of years ago and decided to do a tutorial for it. I also did a bracelet and necklace set for my best friend's mother in law for her birthday in the Delta Sigma Theta colors.
The bracelet is made the same but the necklace is made with
Monday, March 30, 2015
Be Jeweled Earrings Bead Pattern
Netting and Right Angle Weave
 Busy, busy week and weekend! I'm starting to think this is the norm for the next while. It doesn't help that my time management skills stink. I feel like I'm constantly rushing to go here or do this or that.
 Aside from squeezing in some beading for a couple of orders and trying to figure out what I did with my tutorial photos last year (deleted them, of course), we had my oldest children's baptisms on Saturday, had a new calling at church, did some cake and cupcake orders at work, and of course, the regular weekly activities, etc...
BUT amidst the chaos about midweek, I got home and had the best surprise waiting for me!
Friday, March 27, 2015
Herringbone Pearl Rope Bead Pattern
Tubular Herringbone

This tubular
herringbone rope is very simple and beads up quickly. I used this bead woven
rope in my Blue Victorian Pendant Necklace and absolutely love the way
it feels! All photos are shown with blue beads but I have indicated in
the instructions on what beads to use.
 |
| Blue Victorian Pendant Necklace on Etsy |
What you will need:
I have put in
parenthesis how I will refer to the beads in the tutorial.
-Approximately 400
4MM glass or similar pearl beads. I used acrylic for mine. (4MM)
-10 grams size 11/0
Miyuki Round, S/L Crystal #1 (Silver 11/0)
-1 gram size 15/0
Miyuki Round, S/L Crystal #1 (Silver 15/0)
-Clasp
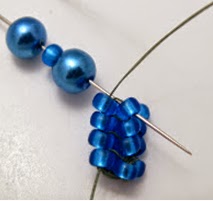
1. Row 1-Pull as much thread as you are comfortable working with and thread your
needle. Leaving a 10 inch tail to add the silver 15/0s on the end and clasp,
start the tubular herringbone rope base by making a ladder stitch 4 beads
across using silver 11/0s. The ladder stitch is briefly shown below.
 |
| 1a |
 |
| 1b |
 |
| 1c |
 |
1d
|
 |
1e
|
2. Connect the two ends
together to form a circle by making a ladder stitch between the two end beads.
 |
| 2 |
3. Row 2-Working in a
herringbone stitch, pick up two silver 11/0 seed beads and bring your
needle down through the base bead to the right of where your thread is coming
from(3a), then back up through the base bead to the right of where your thread is (3b).
 |
| 3a |
 |
| 3b |
4.
Pick up and add the next two silver 11/0s by bringing your needle down through
the bead to the right (4a) and coming back up through bottom of the next stack of
beads to the right (4b). This is stepping up to start the third row.
 |
| 4a |
 |
| 4b |
5. Row
3 and 4-Pick
up the next two silver 11/0s and bring your needle through only the top
silver 11/0 bead to the right of where your needle is coming from (5a), then
back up through the bottom of the top silver 11/0 to the right (5b).
Repeat this for the next side (5c). Step up through the bottom of the top two beads of the next stack to the right and repeat this step for the 4th row (5d).
 |
| 5a |
 |
| 5b |
 |
| 5c |
 |
| 5d |
6. (Photos left to right) Row 5- Pick up a 4MM pearl, a silver 11/0 and 4MM pearl. Continue in a herringbone stitch to add this to the stacks of silver 11/0s. Repeat for the other side. Step up through the top two beads in the stack to the right (silver 11/0 and 4MM pearl).
 |
| 6a |
 |
| 6b |
 |
| 6c |
7. Row 6- Repeat Step 6 (7a) except as you come through the bottom of the
4MM pearls to add additional beads, pick up a silver 11/0 and bring your needle up through the
bottom of the 4MM pearls (7b). This hides the string a little better and gives the
rope a little more sparkle. Continue to repeat this step by adding beads until
you reach about 1 inch less your desired length. Example: 18” rope, stop at
17”.
 |
| 7a |
 |
| 7b |
 |
| 7c |
 |
| 7d |
8. To end
the rope, we will be doing the opposite of how we started to taper down to the
end. Start to taper by adding the 2 silver 11/0s to each stack on top and
adding the final silver 11/0s underneath the 4MM pearls you are coming up
through. These are the last ones you will add.
 |
| 8a |
 |
| 8b |
9. For the next
row, add the 2 silver 11/0's to each stack but DO NOT add the silver 11/0's
underneath. Step up to complete the last 2 rows with silver 11/0's.
 |
| 9 |
10. After you complete
4 rows of the silver 11/0's, switch to silver 15/0's to complete the last 4 rows.
You should have a total of 8 rows of seed beads on the end.
 |
| 10 |
11.
Pick up 3 silver 15/0's, one clasp end and 3 more silver 15/0's and bring your
needle down through the stack that is diagonal from where your thread is coming
from.
 |
| 11 |
12. Bring your needle
up through the stack of 4 silver 15/0s to the right.
 |
| 12 |
13. Bring your needle
up through the loop of silver 15/0's going through the clasp. This should
straighten this loop over the 2 stacks.
 |
| 13 |
14. Come through the
clasp and then down the stack to the right to straighten this side. To
reinforce, come back up the stack to the right, pass back through the clasp and
back down the right stack of silver 15/0s AND the silver 11/0s below it. Weave
your needle down through your piece, tying 3-4 half-hitch knots to secure and
cut your thread.
 |
| 14 |
15. For the other end,
thread the tail and add 4 rows of silver 15/0s. Repeat steps 11-15 to add the
clasp and end your thread. Hope you enjoyed the
tutorial. Follow me on Facebook and Instagram!
 |
| 15 |

Wednesday, March 25, 2015
Beaded Flower Hair Clip Pattern
 Simple Bead Embroidery Pattern
I'm still working on getting my blog back up and so far, I think I'm liking Blogger. It seems a little easier to post to vs Wp but I guess today will really be the test. Here's a simple one :)
What you will need:
Tuesday, March 24, 2015
Free Captured Ring Beading Pattern
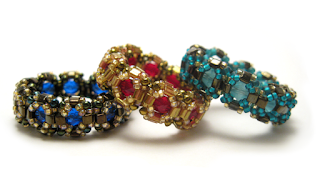 Right Angle Weave and Netting Ring
It's so good to be back in the beading world after a much needed break and am hoping to get some new stuff up soon!
Subscribe to:
Posts (Atom)


