


Net Weave, Ladder and Peyote Stitch Bracelet Pattern
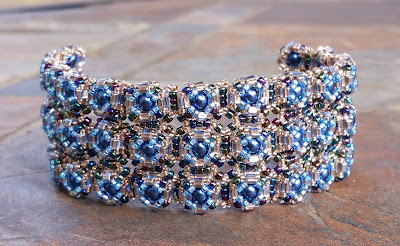
I think next to Tilas and regular seed beads, triangles are my next favorite beads to work with and recently, I've been trying to incorporate them into more pieces. They are fantastic to add some accent color or a little different shape and texture to a piece.
Just a warning on this bracelet: the triangles like to do their own thing, so you may need to adjust them around to get them to lay right. The beads do not sit "perfectly" each time, so each beaded section may turn out a little different.

I have put in parenthesis how I will refer to the beads throughout the pattern.
Materials list for 6 & 1/2" bracelet:
3 g 15/o metallic antique gold seed beads (gold SB 15/o)
3 g 15/o rainbow lined blue seed beads (blue SB 15/o)
5 g 11/o metallic antique gold seed beads (gold SB 11/o)
5 g 11/o metallic blue iris seed beads (iris SB 11/o )
3 g 11/o gold lined Montana blue Toho triangle beads
48 Montana blue 4mm glass pearl
48 Montana blue 4mm glass pearl
Beading needle
sharp, #11 or #12
 Thread 6lb Fireline
or Nymo D. 4lb is fine and may work better in some spots.
Thread 6lb Fireline
or Nymo D. 4lb is fine and may work better in some spots.Clasp- I have not shown directions for adding a clasp in this tutorial.
Base
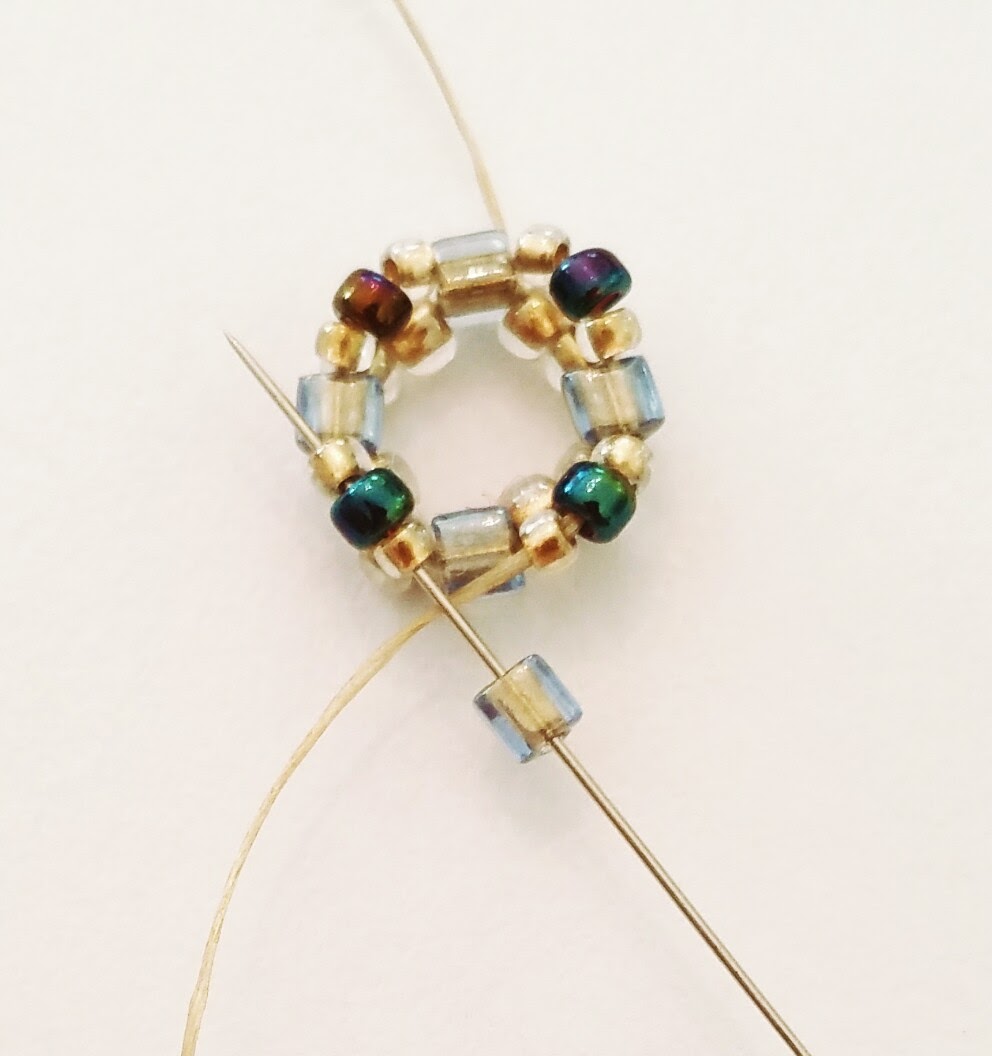
1. String 2 gold SB 11/o, and 1 triangle 4 times, for a total of 12 beads. Pass back through all beads again to create a ring. Tie a knot with the working and tail threads to secure.

2. Exit through the nearest triangle.

Round 1
3. String 1 gold SB 15/o, 1 iris SB 11/o and 1 gold SB 11/o; pass through the next triangle.

4. Repeat Step 3 for all 4 triangles.


5. Step up to exit through the first seed bead embellishment added in Step 3.

Round 2
6. String 1 triangle; pass through the next seed bead embellishment.
7. Repeat Step 6 for all 4 seed bead embellishments.


**Steps 8 through 11 may be a little difficult to understand. I used this thread path because the pearl straightens out well with it, and you don't have to go through the round but a couple of times.
8. Exiting out between a triangle and gold SB 15/o, string a 4mm pearl. Pass through the gold SB 15/o diagonal from the exiting gold SB 15/o, then through the remainder of the embellishment (see photo).

9. Continue to pass through to exit the SB 15/o across from the starting gold SB 15/o (diagonal gold SB 15/o with a red arrow) of the last step.

10. Pass through the 4mm pearl.

11. Pass through the gold SB 15/o ACROSS from the initial gold SB 15/o (see arrow) in Step 8, then step up though to exit the next triangle.
** This beaded section now has a top/bottom and sides. The height is slightly narrower than the width. Keep this in mind as you add additional beaded sections on. Try to add the pearl in the same direction each time so the longer widths go the same direction, as does the shorter heights.

Round 3
12. String 2 blue SB 15/o; pass through the next triangle.

13. Repeat Step 12 for all 4 triangles.


17. Retrace the thread path 2 more times. Keep the thread snug and shape the section with your fingers if needed.

18. Pass to exit through a SIDE top triangle. Pass through the base layer triangle, then through the gold SB 11/o next to the base triangle.

Adjust the piece to where the side is now the bottom.

Connection
19. String 3 iris 11/o. Working in a ladder stitch, pass through the side base layer exited, through the gold SB 11/o, triangle and gold SB 11/o.

20. String 1 gold SB 15/o; pass through the 3 iris SB 11/o added.

21. String 1 gold SB 15/o; pass through the gold SB 11/o, triangle, and gold SB 11/o previously exited in Step 20.

22.Pass through the first added gold SB 15/o and exit through the 3 iris SB 11/o.

23. String 1 gold SB 11/o, 1 triangle and 1 gold SB 11/o. Working in a ladder stitch, pass through the 3 iris SB 11/o

24.String 1 gold SB 15/o; pass through the gold SB 11/o, triangle and gold SB 11/o added.

25. String 1 gold SB 15/o; pass through the 3 iris SB 11/o.

26. Pass to exit through the gold SB 11/o, triangle, and gold SB 11/o added in Step 23.

27. String 1 gold SB, 1 triangle and 1 gold SB 11/o 3 times, for a total of 9 beads. Pass through the exited gold SB 11/o, triangle and gold SB 11/o to make a loop with the added beads. Pass through all beads again to reinforce.

28. Repeat Steps 2 through 11 to embellish the beaded section. Make sure to add the pearl the same direction as the first.

Since I adjusted my piece in Step 18, I will be adding the pearl side ways. (Same photo as above, just sideways)

29. Repeat Steps 12 through 18 to finish up the beaded section and exit through the base triangle and gold SB 11/o. Continue to repeat Steps 19 and 29 until you reach the desired length of your bracelet.

You can stop at this point if you want just a single row tennis bracelet. Add your clasps to each end, secure and end your threads.

Double/Triple Row

31. Add the gold 15/o embellishment, similar to Steps 24 and 25. Pass to exit through the 3 iris SB 11/o.

32. String 1 gold SB 11/o, 1 triangle and 1 gold SB 11/o; pass through the 3 iris SB 11/o exited.

33. Add the top and bottom gold SB 15/o to embellish.

34. Repeat Step 27.

35. Repeat Step 28, then finish embellishing the beaded section.

36. Follow Steps 19 through 27 to add the next section of the second row; finish the beaded section.

37. Pass to exit the top side triangle closest to the first row of the bracelet.

38. Pass to exit through the base side (gold SB 11/o, triangle, gold SB 11/o) beads.

39. Add the 3 connection iris SB 11/o in a ladder stitch.

40. Add the top and bottom gold 15/o embellishment.

41. Pass to exit the 3 iris 11/o.

42. Lining up the working beaded section and the beaded section from the first row, pass down through the adjacent bottom side beads from the first row's beaded section.

43. Pass back up through the 3 iris SB 11/o.

44. Add the top and bottom gold SB 15/o embellishment.

These next photos were taken at a later time and don't quite line up with the thread path above, but work this center section in the direction your thread is going.
45. Pass to exit a gold SB 15/0 from the embellishment added in Step 44.

46. Working in a peyote stitch, string 1 iris SB 11/o; pass through the next 2 gold SB 15/o embellishment directly next to each other in this center section.

47. String 1 iris SB 11/o; pass through the next 2 gold SB 15/o embellishment in the center section.

48. Repeat Step 47 to add an iris SB 11/o in the next 2 spaces between the last 2 gold SB 15/o embellishment sets. Pass through the thread path again to reinforce.


50. Pass through to exit the center section.

51. Weave through to begin your next connection and beaded center section. Continue to add beaded sections to the second row, connecting them to the first row as you bead, then bead each center section. Complete the second row.

52. Complete Steps 30-51 to add a 3rd row to the 2nd row and complete the center sections as you bead.

If you need any help with the instructions, please leave a comment or use the Contact Me tab at the top of the page. Follow me on Facebook and Instagram!
Connect with me


Love this bracelet! What size are the triangles?
ReplyDeleteD
That'd probably help, huh. Sorry about that! Size 11 Toho. Thanks for catching it!
DeleteI have been looking for a pattern to learn the process of making this design. Thank you for this and all of the lovely tutorials you make.
ReplyDeleteThank you Maria! I hope you enjoy the tutorial; please let me know if you need help with any of the instructions :)
Deletemerci beaucoup pour ce tutorial... bonne continuation!
ReplyDeleteYou are welcome and thank you for stopping by!
DeleteLovely bracelet :) Thank you so much !!
ReplyDeleteColleen
You are welcome & thank you for the compliment!
DeleteLovely bracelet & great tut. Thanks so much!!!
ReplyDelete