Friday, July 15, 2016

Vector Diagram or Photo Beading Tutorials?


As someone who puts beading tutorials together to make a little bead money on the side, I try to make my instructions as clear as possible for intermediate and beginning beaders alike. While I was writing my latest pattern though, I ran into a dilemma. Do I use photos or vector diagrams with my instructions and will everyone be able to clearly understand what I am trying to illustrate?

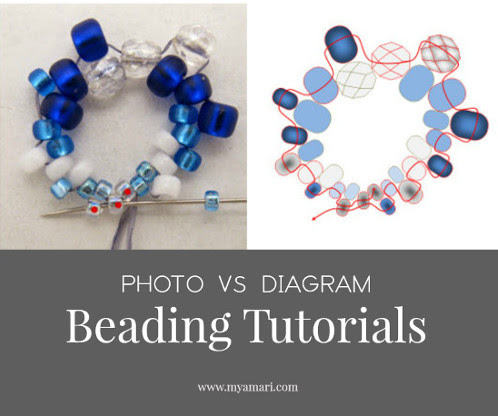
In this post, I would like to discuss a few pros and cons of bead diagrams and photos that I've personally run into, and hopefully help those of you who are considering making your own. There are other ways, such as video tutorials, but my focus here will be on these two methods.

Tuesday, March 22, 2016

Blue Victorian Beaded Earrings Pattern


Free right angle weave earrings beading pattern


Free Right Angle Weave Earring Bead Tutorial

I think it's time to post a free bead pattern on MyAmari. This has been out for a little while on Bead-Patterns.com; I just haven't gotten around to posting a full version of it here. These were made as a matching set to the Blue Victorian Pendant Necklace.

Before we get started though, here's a list of a couple more free earring patterns for you to try!

Around the Beading Table's Dragonfly Earrings
Linda's Crafty Inspiration's Arabella Earrings
MoonPerl's Late Sunset Earrings 


What you will need for the earrings:
I have put in parenthesis how I will refer to the beads in the tutorial:
-4 of 4MM bi cone crystal or glass beads, Teal w/AB Finish (4 MM crystal).
-42 of 3MM pearl glass beads or similar, White (3MM Pearls)
-1 gram size 11/0 Miyuki Round, Matte Silver-Lined Capri Blue #25F (Blue 11/0)
-1 gram size 15/0 seed beads, Transparent Blue (Blue 15/0) I used Bead Treasures Trans Lt Blue Inside Color from Hobby Lobby.
-0.5 gram size 15/0 Miyuki Round, Silver-Lined Crystal #1 (Silver 15/0).
-2 of 4MM glass pearl or similar.
-Size 12 beading needle, scissors & Fire Line (4 or 6 pound test).
-Earring findings. I used hooks.

Saturday, February 27, 2016

Candle Carving Part Two: Basic Supplies To Get Started

 Candle Carving Part Two Basic Set upIn this second post of the Candle Carving series, I will explain the bare essentials needed to get started with Cut and Curl candles. *Disclaimer: I am NOT an expert and this may not work for everyone, but hopefully it will help some of you who are interested in this intriguing medium. I'll be continually adding to these posts as I go along.

If you are the type to just jump in, by all means go for it! Kits are available online and would probably be the fastest and easiest way to get started. Candlefun has two fairly comprehensive packages that include wax, dipping wells, DVDs, carving wrack, pigment, along with some other options available on their site. Although I didn't see kits on this next site, Candles and Supplies also offer training DVDs, carving tools and wax.

Tuesday, February 16, 2016

Candle Carving Part One: The Wax

Getting Started With Cut and Curl Candles


Somewhere along the way of researching candles and ways to use up crayons (and now wax), I found photos of carved candles. They are also called Cut and Curl, Cut and Carve, or Dip and Carve candles; I will use them interchangeably throughout the posts. If you are reading this, more than likely you've heard of them, but if you are unfamiliar with it, type in one of the above phrases in Google.  My first impression was, WOW. The second was, no way can I do that at home. Then, the familiar nagging little voice in the back of my head (I probably should get that checked out one day) said yes you can.

There's not a wealth of detailed instructions and technicalities on how to do these type of candles, unlike beading or cake decorating. What I did find though, were a ton of great YouTube videos showing the carving process. Unfortunately, that's not helpful when you are new to candle making and aren't sure what type of wax to use, what temperature the wax needs to be at when you start dipping, importance of heating the core, making a core candle, making/finding a proper sized wick, etc.

Tuesday, January 26, 2016

Introduction: The Beginning of a New Endeavor


A Day of Candle Making


I'm thinking about transitioning the direction of MyAmari this year that will reflect my personality. I've noticed a pattern of behavior throughout the past few of years of not sticking to just one craft or hobby for a really long time. I get into a slump and that particular undertaking is put on a back burner for a while. Excitement comes with a shiny new (and old) hobby in a month or few, and I'll pour my free time, mental and physical energy into that for a time. 

While this seems like a pointless and endless cycle, I always come back to everything I've put down at some point. So rather than beat myself up constantly about this quirk of mine, I'm just going to embrace it. I'd like to make my focus, or un-focus rather, on the many passions I have. I will still do beading tutorials when I am on my bead kicks, but I would also like to share with others helpful information that I find, and my journey as I go through my other ventures.

Before I get started on my candle making ramble, I have to say that I am married to the most patient and supportive man on the face of the planet. Anything I voice out loud as an idea, he says do it and supports me 100%. Not once has he complained about me starting something new, my craft stashes throughout the house--or just out,  my partially finished projects, although he does nudge every once in a while about our crochet quilt that's still in progress. I so love my honey ♥ Thank you.


This is the introduction of my series of candle carving posts, and how it all started.

It's easy to digress from one idea and turn it into something completely different...

Friday, December 18, 2015

A Bead Break: Knit and Crochet Projects

It's that time again. About a month ago, my friend called me up asking me what I was up to. Usually I'll say something about beading, but this time I responded, "Crocheting." She said, "You know you do this about this time every year, right?" And I guess I do. I put down the beads for a couple of months towards the end

Wednesday, September 23, 2015

Cascade of Pearls


Net Weave, Ladder and Peyote Stitch Bracelet Pattern


 Cascade of pearls bracelet pattern
This pattern has been in the back of my mind since the original Captured bracelet; figured it was time to make it happen!

I think next to Tilas and regular seed beads, triangles are my next favorite beads to work with and recently, I've been trying to incorporate them into more pieces. They are fantastic to add some accent color or a little different shape and texture to a piece. 


Just a warning on this bracelet: the triangles like to do their own thing, so you may need to adjust them around to get them to lay right. The beads do not sit "perfectly" each time, so each beaded section may turn out a little different.


I have put in parenthesis how I will refer to the beads throughout the pattern.


Materials list for 6 & 1/2" bracelet:
3 g 15/o metallic antique gold seed beads (gold SB 15/o)
3 g 15/o rainbow lined blue seed beads (blue SB 15/o)
5 g 11/o metallic antique gold seed beads (gold SB 11/o)
5 g 11/o metallic blue iris seed beads (iris SB 11/o )
3 g  11/o gold lined Montana blue Toho triangle beads
48  Montana blue 4mm glass pearl
Beading needle sharp, #11 or #12
Thread  6lb Fireline or Nymo D. 4lb is fine and may work better in some spots.
Clasp- I have not shown directions for adding a clasp in this tutorial.
 

Subscribe