


Peyote and Netting
I thought this would be a great Mother's day gift for those of you who are looking for something quick to make. These were made to match the Cleopatra necklace.This is the first tutorial I have completed in over a year and wanted to try
a couple of different things out. Tutorials can be a little time consuming and I was in search of a little faster way of getting this all together, and not having to store hundreds of photos on my computer, or pay for additional cloud storage.

I got a Note 4 recently and had the opportunity to see how it panned out for this tutorial. The colors are a little warmer than what the Canon produces but the photos themselves have more detail on the Note. I did tinker a little with the tune setting, so some of the photos are a little different than others. I also ran into an awesome feature. As I looked up photos to upload on Blogger, it gave me the option of choosing photos from my phone. On top of that, all my photos are backed up through Google+ (still not sure if that's a smart move though), which if I'm not mistaken, allows unlimited photos under a certain size.
So, so far, I have taken and edited most all photos in this tutorial (except the main) on my phone, uploaded photos from it without having to move anything around and now am working on a draft. I still need the computer for correct formatting but it's been really nice being able to work on this as I get time here and there away from the computer.
Okay, enough of the tech rambles!
Here's a list of supplies needed for the teal earrings. I have listed in parenthesis how I will refer to the beads through out the tutorial:
16 X 4mm teal crystals (crystal)
8 X 3mm off-white pearls (3mm pearl)
8 X Half Tilas, iris brown, Miyuki TLH458 (Tila)
2 X 6mm off-white pearls (rondelles work too!) (6mm pearl)
2 X 4mm off-white pearls (4mm pearl)
.5 grams bronze 11/0 beads, Miyuki 11-457 (bronze 11/0)
.5 grams iris brown 11 beads, Miyuki 11-458 (brown 11/0)
1 grams gold 15/0 beads (gold 15/0)
2 earring components
 6 pound fireline highly recommended or 4 pound Fireline doubled working with crystals
 Couple of Notes:
When I used 4 pound Fireline, I beaded with it normally half way through. I brought my needle back down the thread half way once I got to the crystals to double up the thread, then cut one of the threads when I got up to the earring component.
If you choose to use rondelles like the black and silver pair below, you won't be able to do the X pattern in the center like the teal pair unless you want the off center oval look :D

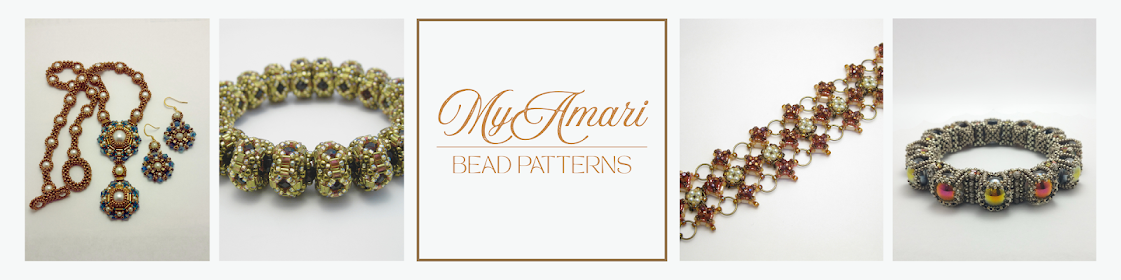
1. String a 6mm pearl, 2 bronze 11/0s, 1 Tila and 2 bronze 11/0s. Pass back through all beads.
 |
| 1 |
2. Pass through the pearl. Pass through all beads again to reinforce if your thread isn't doubled.
 |
| 2 |
3. String 2 bronze 11/0s, a Tila and 2 bronze 11/0s; pass through the pearl. There should be a set of beads around each half of the pearl.
 |
| 3 |
4. Pass back through the beads just added to reinforce.
 |
| 4 |
5. Pass through either half circle set of beads.
 |
| 5 |
6. String 1 Tila; pass through the opposite half circle set of beads.
.jpg) |
| 6 |
7. String 1 Tila; pass back through the first half of the circle. This will complete the first circle around the pearl. This will not sit perfectly centered; this will tighten and the pearl will stick out slightly on one side.
.jpg) |
| 7 |
8. Pass through either side to the bottom hole of the pearl.
 |
| 8 |
9. I flipped my piece over where the pearl was sticking out to add the next round. Pass up through the pearl.
 |
| 9 |
Round 2
10. Start a repeat of Steps 2 through 7 by adding a second beaded circle on top of the first one. String 2 bronze 11/0s, a Tila and 2 bronze 11/0s; pass up through the pearl. Reinforce added beads, ending through the pearl.
 |
| 10 |
11. Repeat Step 10 to add the second half circle of beads around the pearl. Pass down through to either gap.
 |
| 11 |
12. String a Tila and pass through the other half circle set of beads.
 |
| 12 |
13. Complete the circle by adding the last Tila. Pass through the complete circle to reinforce. This will complete the second circle around the pearl.
 |
| 13 |
14. Pass through to any set of 2 bronze 11/0s. I will refer this as the first circle, and the bottom circle as the second circle.
 |
| 14 |
Round 3
15. String 1 gold 15/0, a 3mm pearl and 1 gold 15/0. Pass through the set of bronze 11/0s in the second circle below the bronze beads your thread is exiting from in the first circle, coming in through the opposite side of where your thread is exiting. This should make a half "X" .
 |
| 15 |
16. String 1 gold 15/0; pass through the 3mm pearl.
 |
| 16 |
17. String another gold 15/0 and pass through the first set of bronze 11/0s that you initially started out from in Step 15 in the first circle, then through the next Tila.
 |
| 17 |
18. Pass through the next set of bronze 11/0s in the first circle.
 |
| 18 |
19. Repeat Step 15 by stringing 1 gold 15/0, a 3mm pearl and 1 gold 15/0. Pass through the bronze beads in the second circle, coming in through the opposite end of where your thread is exiting.
 |
| 19 |
20. String 1 gold 15/0. Pass through the set of bronze beads you started out from in Step 18.
 |
| 20 |
21. Pass through the next Tila to the next set of bronze beads.
 |
| 21 |
22. Repeat Steps 18 through 20 for the last 2 bronze seed bead sets and embellish them with the 3mm pearl and gold seed beads to finish up Round 3.
 |
| 22 |
23. Pass through to any Tila.
 |
| 23 |
24. Weave up to the end outer hole of the Tila.
 |
| 24 |
Round 4
25. String 2 brown 11/0s; pass through the closest 3mm pearl, working in the direction of where your thread is exiting.
 |
| 25 |
26. String 2 more brown 11/0s and pass through the next Tila, through the outer hole.
 |
| 26 |
27. String 2 brown 11/0s; pass through the next pearl.
 |
| 27 |
28. Repeat Steps 26 and 27 to finish adding 2 brown 11/0s between each Tila and pearl and complete Round 4.
 |
| 28 |
Round 5
29. Pass through the first added brown 11/0s from Round 3, through the 3mm pearl and next closest brown 11/0 .
 |
| 29 |
30. Flip your piece over to the back side.
 |
| 30 |
31. Through out this round, you will be sharing the 2 brown 11/0s sitting on each side of the 3mm pearls and using a netting stitch. String 1 brown 11/0 and pass through the closest Tila.
 |
| 31 |
32. String 1 brown 11/0; pass through the pearl and the brown 11/0s on each side of the pearl, skipping over the brown 11/0s next to the Tilas.
 |
| 32 |
33. String 1 brown 11/0 and pass through the next Tila.
 |
| 33 |
34. Continue to repeat Steps 32 though 33 to add brown 11/0s on this side of the earring to straighten out the center pearl.
 |
| 34 |
35. Pass through the closest Tila and brown 11/0s on each side of the working Tila.
 |
| 35 |
36. I have shown this step from 2 different angles. String 2 gold 15/0s, a crystal and 2 gold 15/0s. Pass through the brown 11/0s and Tila beads on the opposite circle, coming in through the opposite end of where your thread is exiting from. Pull your thread.
 |
| 36a |
 |
| 36b |
 |
| 37 |
38. String another gold 15/0s and pass through the brown 11/0s and Tila you started from in Step 36.
 |
| 38a |
 |
| 38b |
39. String 3 gold 15/0s, a crystal and 3 gold 15/0s. Pass through the next Tila and set of brown 11/0s on each side of the Tila. These added beads should sit over of a 3mm pearl.
 |
| 39a |
40. Start repeating Step 36 by stringing 2 gold 15/0s, a crystal and 2 gold 15/0s. Pass through the brown 11/0s and Tila beads on the opposite circle, coming in through the opposite end of where your thread is exiting from. Pull your thread.
 |
| 40 |
41. String 1 gold 15/0; pass through the crystal and the gold 15/0 on each side of the cyrstal. Pull thread snug.
 |
| 41a |
 |
| 41b |
43. String 1 gold 15/0 pass through the brown 11/0s and Tila you started out from in Step 40.
 |
| 43 |
44. Continue Round 6 by to repeating Steps 36 to 39 to add the crystal and gold 15/0 embellishment around this side of the earring.
 |
| 44a |
 |
| 44b |
45. Once embellishments have been added in Round 6, pass through to the closest crystal, then out through the gold 15/0 sitting next to the crystal.
 |
| 45 |
Round 7
46. Flip the piece back over. You will start to straighten out the crystal embellishment.
 |
| 46 |
47. String 2 gold 15/0s; pass through the closest Tila and brown 11/0s on each side of the Tila bead. Pull thread.
 |
| 47 |
48. String 2 gold 15/0s; pass through the next crystal and gold 15/0s on each side of the crystal.
 |
| 48 |
49. Continue to repeat Steps 47 and 48 to finish the embellishment and straighten the crystals in this round.
 |
| 49 |
50. Once Round 7 is complete, position your thread to come out of a crystal and a gold 15/0.
 |
| 50 |
Round 8
51. String 1 brown 11/0; pass through the crystal and gold 15/0s on each side of the next crystal.
 |
| 51 |
52. Repeat Step 51 and string 1 brown 11/0; pass through the next crystal and gold 15/0 set.
 |
| 52 |
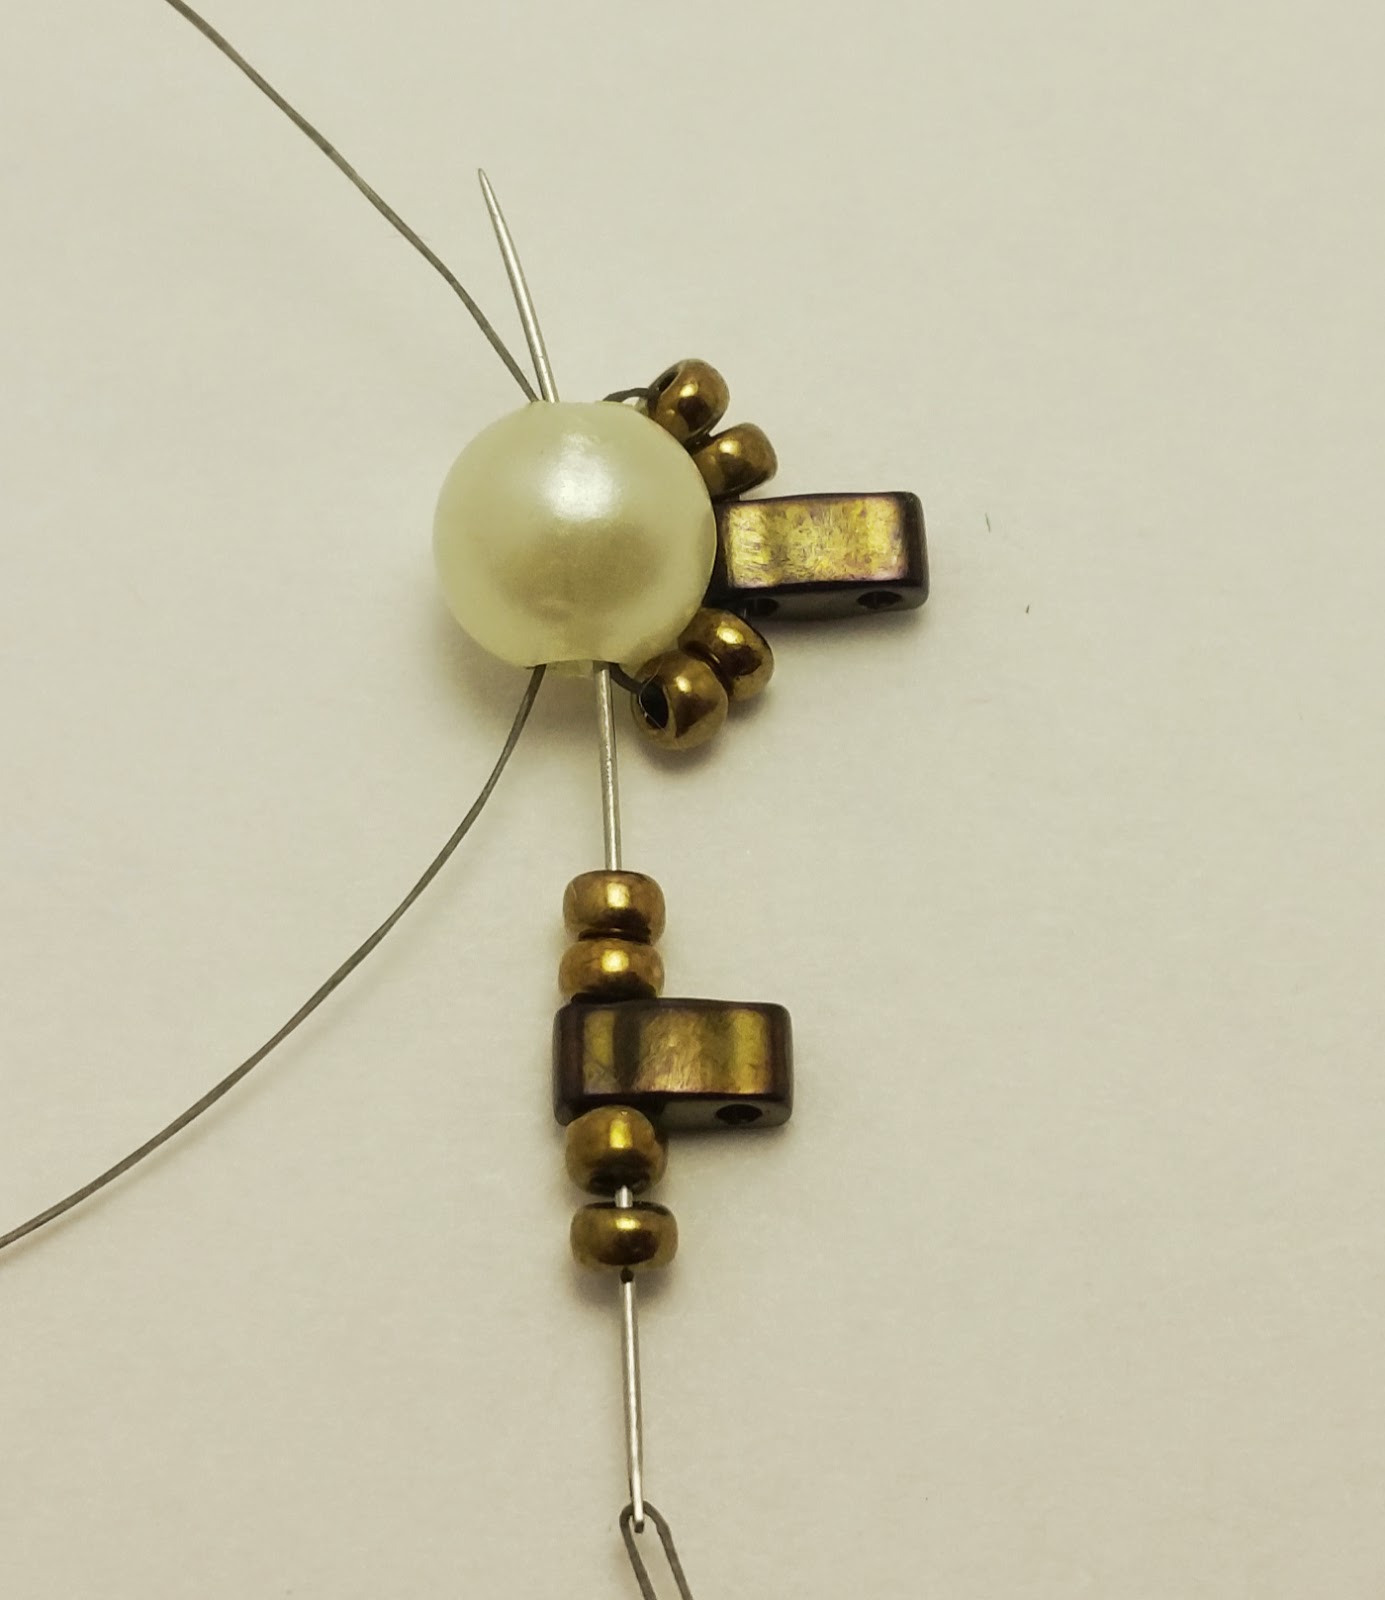
53. Continue to repeat Step 51 for all crystals. Once complete, pass your needle through to a brown 11/0. There are a couple of ways you can create these earrings with a different center design. I personally like the X, so I am coming out through a crystal that is sitting over a Tila. If you look at the photo below with both earrings (52b), the brown set was done by passing through a crystal, gold and brown beads sitting over the pearl. Which ever you decide, just make sure you match it for the second earring!
 |
| 53a |
 |
| 53b |
Add the Earring Component
54. String 2 gold 15/0s, 4 brown 11/0s and 2 gold 15/0s; skip over the crystal and gold seed beads and pass through the closest brown 11/0, similar to a peyote stitch.
 |
| 54 |
55. String 1 gold 15/0; pass up through the beads just added through to the brown 11/0 you started out from in Step 54.
 |
| 55 |
56. String another gold 15/0; pass through the beads added in Step 54 again to reinforce. Repeat this thread path again on both sides.
 |
| 56 |
57. Pass up through the added beads to exit out of the third brown 11/0 from the right.
 |
| 57 |
58. String 4 bronze 11/0s and a 4mm pearl.
 |
| 58 |
59. Pass through the 3rd brown 11/0 you exited from in Step 57, then through the 4 bronze 11/0s and 4mm pearl. Pull thread snug.
 |
| 59 |
60. Pass back through this thread path again to reinforce, ending through the pearl.
 |
| 60 |
61. Pass through to exit out the 2nd from the right, brown 11/0 in the beads added in Step 54.
 |
| 61 |
62. String 4 bronze 11/0s and pass through the pearl and 2nd brown 11/0 you started out from is Step 61. Pull thread snug. Repeat this thread path to reinforce.
 |
| 62 |
63. Coming out of either side of the partial circle around the pearl, string 4 gold 15/0s and your earring component. Pass through the opposite side of the circle to complete it.
 |
| 63 |
64. Pass through this circle again, including the brown 11/0s below the pearl to reinforce 2-3 times. Tie your thread in and end. Complete all steps again for second earring.
 |
| 64 |
Connect with me


Thank you for sharing this beautiful tutorial.
ReplyDelete