


 Simple Bead Embroidery Pattern
I'm still working on getting my blog back up and so far, I think I'm liking Blogger. It seems a little easier to post to vs Wp but I guess today will really be the test. Here's a simple one :)
What you will need:
 -An artificial flower pulled apart. I
used a purple mum but you can use anything. Be careful as some have glue that
keep the petals and layers together and makes it harder to sew through.
-An artificial flower pulled apart. I
used a purple mum but you can use anything. Be careful as some have glue that
keep the petals and layers together and makes it harder to sew through.
-A 4 MM glass or acrylic pearl bead.
-A variety of seed beads, your choice of
color. I used size 10 Czech opaque white, size 11 Miyuki round silver-lined
crystal, size 11 Miyuki round opal, and size 8 white satin Japanese cylinders.
-Hair clip with a hole on the end to sew
through.
-Size 11 or 12 beading or sewing needle,
thread/wax or FireLine and scissors.
 |
| 1 |
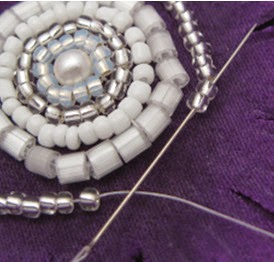
2. Bring your needle up through the flower close to the
4MM pearl but not directly under it.
 |
| 2 |
 |
| 3 |
4. Sew up through the flower inside of the seed bead circle as we will start to secure
these beads to the flower using the couching method.
 |
| 4 |
5. Sew down on the outside of the seed bead circle across
from where your thread is coming from. This should have your thread going over
the circle. Once you pull your needle through the bottom, this thread will
secure the thread going through the inside of the seed beads.
 |
| 5 |
6. Skip a couple of beads, then repeat steps 4 and 5
around the circle, coming up through the inside of the circle and down the
outside of it to secure the beads to the flower. You will want to do this
between every 2-3 beads.
 |
| 6 |
7. Once the seed beads have been secured, sew up just
outside of the circle (7a). Pick up your next set of seed beads to go around the
previous circle you just made (7b). I used 20 silver-lined crystal 11/0s. Sew down
as close as possible to where your thread is coming out from. Secure this seed
bead circle by repeating steps 4-5 (7c).
 |
| 7a |
 |
| 7b |
 |
| 7c |
8. Continue
to add seed beads around in layers and repeat steps 4-5 (8a, b) to secure them to the
flower. It may help to go through a couple of beads at the end of the circle
first before sewing down into the flower to help straighten out the circle and
prevent gaps (8c). Complete all bead layers and sew through to the bottom of the
flower.
 |
| 8a |
 |
| 8b |
 |
| 8c |
9. Turn the
flower over and add the TOP of the clip to the bottom of the flower. Sew this
on to secure, taking care when going through the beads on the other side. When
the clip is secured, sew a couple of stitches through the bottom of the flower
and tie a knot. Repeat a couple of times, keeping your needle in the bottom
layer of the flower and under the beads. Cut your thread. *Optional step-
The bottom part isn't seen when it’s on but you can glue a petal or leaf to the
bottom to cover up the stitches. I used E-6000 adhesive to glue a petal on a
rose clip I did but I think a hot glue gun will work too.
 |
| 9 |
Connect with me


No comments:
Post a Comment