


Tubular Herringbone

This tubular
herringbone rope is very simple and beads up quickly. I used this bead woven
rope in my Blue Victorian Pendant Necklace and absolutely love the way
it feels! All photos are shown with blue beads but I have indicated in
the instructions on what beads to use.
 |
| Blue Victorian Pendant Necklace on Etsy |
What you will need:
I have put in
parenthesis how I will refer to the beads in the tutorial.
-Approximately 400
4MM glass or similar pearl beads. I used acrylic for mine. (4MM)
-10 grams size 11/0
Miyuki Round, S/L Crystal #1 (Silver 11/0)
-1 gram size 15/0
Miyuki Round, S/L Crystal #1 (Silver 15/0)
-Clasp
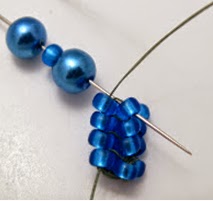
1. Row 1-Pull as much thread as you are comfortable working with and thread your
needle. Leaving a 10 inch tail to add the silver 15/0s on the end and clasp,
start the tubular herringbone rope base by making a ladder stitch 4 beads
across using silver 11/0s. The ladder stitch is briefly shown below.
 |
| 1a |
 |
| 1b |
 |
| 1c |
 |
1d
|
 |
1e
|
2. Connect the two ends
together to form a circle by making a ladder stitch between the two end beads.
 |
| 2 |
3. Row 2-Working in a
herringbone stitch, pick up two silver 11/0 seed beads and bring your
needle down through the base bead to the right of where your thread is coming
from(3a), then back up through the base bead to the right of where your thread is (3b).
 |
| 3a |
 |
| 3b |
4.
Pick up and add the next two silver 11/0s by bringing your needle down through
the bead to the right (4a) and coming back up through bottom of the next stack of
beads to the right (4b). This is stepping up to start the third row.
 |
| 4a |
 |
| 4b |
5. Row
3 and 4-Pick
up the next two silver 11/0s and bring your needle through only the top
silver 11/0 bead to the right of where your needle is coming from (5a), then
back up through the bottom of the top silver 11/0 to the right (5b).
Repeat this for the next side (5c). Step up through the bottom of the top two beads of the next stack to the right and repeat this step for the 4th row (5d).
 |
| 5a |
 |
| 5b |
 |
| 5c |
 |
| 5d |
6. (Photos left to right) Row 5- Pick up a 4MM pearl, a silver 11/0 and 4MM pearl. Continue in a herringbone stitch to add this to the stacks of silver 11/0s. Repeat for the other side. Step up through the top two beads in the stack to the right (silver 11/0 and 4MM pearl).
 |
| 6a |
 |
| 6b |
 |
| 6c |
7. Row 6- Repeat Step 6 (7a) except as you come through the bottom of the
4MM pearls to add additional beads, pick up a silver 11/0 and bring your needle up through the
bottom of the 4MM pearls (7b). This hides the string a little better and gives the
rope a little more sparkle. Continue to repeat this step by adding beads until
you reach about 1 inch less your desired length. Example: 18” rope, stop at
17”.
 |
| 7a |
 |
| 7b |
 |
| 7c |
 |
| 7d |
8. To end
the rope, we will be doing the opposite of how we started to taper down to the
end. Start to taper by adding the 2 silver 11/0s to each stack on top and
adding the final silver 11/0s underneath the 4MM pearls you are coming up
through. These are the last ones you will add.
 |
| 8a |
 |
| 8b |
9. For the next
row, add the 2 silver 11/0's to each stack but DO NOT add the silver 11/0's
underneath. Step up to complete the last 2 rows with silver 11/0's.
 |
| 9 |
10. After you complete
4 rows of the silver 11/0's, switch to silver 15/0's to complete the last 4 rows.
You should have a total of 8 rows of seed beads on the end.
 |
| 10 |
11.
Pick up 3 silver 15/0's, one clasp end and 3 more silver 15/0's and bring your
needle down through the stack that is diagonal from where your thread is coming
from.
 |
| 11 |
12. Bring your needle
up through the stack of 4 silver 15/0s to the right.
 |
| 12 |
13. Bring your needle
up through the loop of silver 15/0's going through the clasp. This should
straighten this loop over the 2 stacks.
 |
| 13 |
14. Come through the
clasp and then down the stack to the right to straighten this side. To
reinforce, come back up the stack to the right, pass back through the clasp and
back down the right stack of silver 15/0s AND the silver 11/0s below it. Weave
your needle down through your piece, tying 3-4 half-hitch knots to secure and
cut your thread.
 |
| 14 |
15. For the other end,
thread the tail and add 4 rows of silver 15/0s. Repeat steps 11-15 to add the
clasp and end your thread. Hope you enjoyed the
tutorial. Follow me on Facebook and Instagram!
 |
| 15 |

Connect with me


No comments:
Post a Comment