


Right Angle Weave and Netting
This ruby and bronze Layered Tila Bracelet stemmed from my Tila Crystal Box Bracelet Pattern but uses firepolished beads instead of crystals.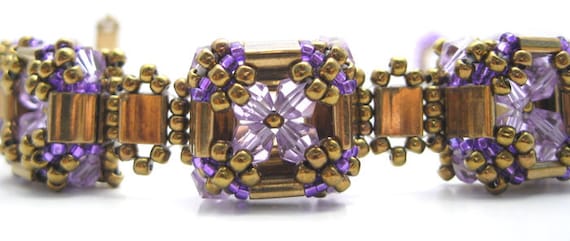 |
| Tila Crystal Box Bracelet on Etsy |
51 Tila beads, Matte Metallic Copper #TL-2005
22 4MM Czech fire polished beads, Ruby
33 3MM Czech fire polished beads, Garnet
5 grams size 11/0 Miyuki seed beads, Metallic Bronze Copper #11-457a
5 grams size 15/0 Miyuki seed beads, Metallic Bronze Copper #15-457c
*Please note these are the beads I happened to have on hand but am not sure how available the finish/colors are. You can achieve a more metallic look with regular #457 Miyuki seed beads and #457 Tila beads.
Clasp-I have instructions to make your own but you can use a regular clasp.
Thread, scissors, size 12 beading needle. I used Nymo size D Red but Fire Line is great too.
Download the Layered Tila Bracelet PDF
Download the Layered Tila Bracelet PDF
Making A Layered Square
1. Pull about 5 feet of thread and thread your needle. Pick up 4 tila beads and add them to your thread. Leave a 2 and 1/2 foot tail for the clasp. Pass through the first tila strung, coming in the opposite side of where your thread is coming out from to create a loop/square with the tilas.
 |
| 1 |
2. Round 1 Pick up one copper 11/0; working in a counter-clockwise direction, pass through the next tila.
 |
| 2 |
3. Repeat Step 2 to continue Round 1 by adding one copper 11/0 in each corner. Pass through the last tila, then though the first copper 11/0 added in Step 2.
 |
| 3a |
 |
| 3b |
 |
| 3c |
4. Round 2 Pick up 3 copper 11/0 beads; pass back through the same copper 11/0 , coming in from the opposite side of where your thread is coming out from. This will form a right angle weave loop in this corner.
 |
| 4 |
5. Pass through all beads in this right angle loop to strengthen, then through the tila and the copper 11/0 on the next corner.
 |
| 5a |
 |
| 5b |
6. Repeat Step 4 and 5 for the next corner.
 |
| 6a |
 |
| 6b |
 |
| 6c |
7. Continue to repeat Steps 4 and 5 for the next corner.
 |
| 7a |
 |
| 7b |
 |
| 7c |
8. Repeat Step 4 for the last corner. Pass back through all beads in the right angle loop. Weave through the loop to the top end copper 11/0 of the corner.
 |
| 8a |
 |
| 8b |
9. Round 3 Pick up a 3MM bead; working clockwise, pass through the next corner copper 11/0.
 |
| 9 |
10. Pick up another 3MM bead; pass through the next corner copper 11/0.
 |
| 10 |
11. Repeat Step 9 to continue Round 3 for the last 2 corners so that you have a 3MM bead on each tila.
 |
| 11a |
 |
| 11b |
12. Pass back through all 3MM beads and corner 11/0s from Round 3. Keep your thread tight to strengthen this top loop.
 |
| 12a |
 |
| 12b |
 |
| 12c |
 |
| 12d |
13. Weave through any corner down to the bottom copper 11/0 that is connected between the tilas from Steps 2 and 3.
 |
| 13 |
14. Pass through the tila. This shows how it would look from top and bottom.
 |
| 14a |
 |
| 14b |
15. Pass through to the outer hole of the tila you are working in.
 |
| 15 |
16. Round 4 Pick up 2 copper 15/0s, 1 copper 11/o and 2 copper 15/0s. Working clockwise, bring your needle through the outer hole of the next tila.
 |
| 16 |
17. Repeat Step 16 for each corner to continue Round 4. On the last corner, pass through the tila and the first 2 copper 15/0s added in Step 16.
 |
| 17a |
 |
| 17b |
 |
| 17c |
18. Round 5 Start this round by skipping over the very next copper 11/0; working clockwise, pass through the next 2 copper 15/0s and the next tila. This should allow the copper 11/0 you skipped over to pucker out. If needed, use your needle to pull the copper 11/0 out.
 |
| 18 |
19. Pick up 1 tila; bring your needle back through the previous tila, coming in from the opposite side that your thread is coming out from. Pass through the just added tila.
 |
| 19a |
 |
| 19b |
20. Pass through the previous tila; continue to work clockwise and pass through the next 2 copper 15/0 beads.
 |
| 20 |
21. Skip over the copper 11/0 and pass through the next 2 copper 15/0 beads and the next tila. Pick out the corner copper 11/0 if needed.
 |
| 21 |
22. Pick up 1 tila and pass through the previous tila, coming in through the opposite side of where your thread is coming out from. Pass back through both tilas to strengthen.
 |
| 22 |
23. Pass through the previous tila and through the next 2 copper 15/0s beads.
 |
| 23 |
24. Continue Round 5 by repeating Steps 18 through 21 for all 4 sides, adding a tila bead to each of the bottom layer tila beads.
 |
| 24a |
 |
| 24b |
25. I have turned my piece to where the left side is now the bottom. Pass through the last tila added in Step 24
 |
| 25 |
26. Round 6 Flip your just added tilas up(inward). Pick up beads in this order: 1 copper 11/0, 1 copper 15/0, a 4MM bead, 1 copper 15/0 and 1 copper 11/0. Working in a counter-clockwise direction, pass through the next tila, using the bottom hole of the top layer tila bead.
 |
| 26 |
27. Repeat Step 26 to continue Round 6 for each corner, using the same bottom hole of the top layer tilas. Pull thread snug.
 |
| 27a |
 |
| 27b |
 |
| 27c |
28. Round 7 Keep thread snug. Continue to work counter-clockwise and string 5 copper 15/0 beads; pass through the next tila, using the same bottom holes as Steps 26 and 27. Some tilas may be a little tricky to get to as you may have to back out of a couple of beads since your needle may want to go through the seed beads and fire polish also.
 |
| 28 |
29. Repeat Step 28 to continue Round 7 for all 4 corners. Keep thread snug.
 |
| 29a |
 |
| 29b |
 |
| 29c |
30. Weave up through the last tila up to the top hole.
 |
| 30 |
31. Round 8 Pick up 3 copper 15/0s; working clockwise, pass through the next tila, using the top hole.
 |
| 31 |
32. Repeat Step 31 to continue Round 8 for all 4 inner corners. Keep thread snug as you work. Pass back through ALL tilas and 15/0s added in Round 8 to strengthen this inner loop, keeping thread snug.
 |
| 32a |
 |
| 32b |
 |
| 32c |
Making the connection
33. Weave down to the bottom hole of the tila.
 |
| 33a |
 |
| 33b |
34. Flip your piece over to where the bottom side is facing up.
 |
| 34 |
35. Pick up 1 copper 11/0, a 3MM bead and 1 copper 11/0. Pass through the same bottom tila, coming in on the opposite side your thread is coming from to form a loop.
 |
| 35 |
36. Pass through all beads added in Step 35 and the tila to strengthen. Weave through to the 3MM bead.
 |
| 36 |
37. Flip your piece over to where the top side is up.
 |
| 37 |
38. Pick up 1 copper 11/0, 1 tila and 1 copper 11/0. Pass through the 3MM bead, going through the opposite side of where your thread is coming out from.
 |
| 38 |
39. Pass through the 3MM, copper 11/0s and tila again to strengthen. Weave to the first tila hole closest to the 3MM bead(hole we have been working through already).
 |
| 39a |
 |
| 39b |
40. Pick up 3 copper 15/0 beads; pass through the end hole of the tila. This should allow the copper 15/0 beads to sit on one side of the tila.
 |
| 40 |
41.Pick up 3 copper 15/0s again and pass through the previous hole in the tila AND and the first strung copper 15/0 on the other side.
 |
| 41 |
42. Skip over the center(second strung) copper 15/0; pass through the last copper 15/0, the tila AND the first strung copper 15/0 added in Step 41 on the other side of the tila. This will allow the side embellishment to stick out a little. Use your needle to pick out the center copper 15/0 if needed.
 |
| 42 |
43. Skip over the center copper 15/0; pass through the first strung copper 15/0 on this side, through the tila and the copper 15/0 on the other side of the tila. Use your needle to pick out the center copper 15/0 if needed.
 |
| 43 |
44. Skip the center copper 15/0 on this side; pass through the last copper 15/0 and the tila ONLY.
 |
| 44 |
45. Pick up 1 copper 11/0, a 3MM and 1 copper 11/0; pass through the tila going in on the opposite side your thread is coming out from. Pass through all beads added in this step and the tila to strengthen.
 |
| 45 |
46. Weave through to the 3MM bead.
 |
| 46 |
47. Pick up 1 copper 11/0, 1 tila and 1 copper 11/0; pass through the 3MM bead. Pass through all beads added in this step and the 3MM to strengthen.
 |
| 47 |
48. Weave through to the end hole of the tila.
 |
| 48a |
 |
| 48b |
 |
| 48c |
Starting Your Next Layered Square
49. Pick up 3 tilas; pass through the previous tila, coming in on the opposite side of where your thread is coming out from.
 |
| 49 |
50. Repeat Steps 2 through 32 from Making a Layered Square to create your next layered square. Once your next square is complete, follow Making a Connection to connect to your next layered square. For a 7 inch bracelet end to end, which is 6 and 3/4 wearable, follow directions to make 5 squares. Each square with one connection is 1 inch. Add or remove squares, or adjust the clasp directions to fit your needs. Repeat these steps until your bracelet is about 1 inch less than the desired length so you can add your clasp.
 |
| 50 |
Making a Tila Toggle Bar and Ring Clasp
Toggle Bar
51. Take the 2 and 1/2 foot tail thread you left from Step 1, thread your needle and repeat Steps 33-47 from Making a Connection. Repeat Steps 40-44 to add your side embellishments to the end tila bead.
Toggle Bar
51. Take the 2 and 1/2 foot tail thread you left from Step 1, thread your needle and repeat Steps 33-47 from Making a Connection. Repeat Steps 40-44 to add your side embellishments to the end tila bead.
 |
| 51a |
 |
| 51b |

52. Pick up 1 copper 11/0, a 4MM bead and 1 copper 11/0; pass through the tila, coming in on the opposite side of where your thread is coming out from. Pass through all of these beads including the tila 3 times to strengthen.
 |
| 52 |
53. Weave through the 4MM bead.
 |
| 53 |
54. Pick up 1 copper 11/0, a tila and 1 copper 11/0. Pass through all beads including the 4MM bead 2 times to strengthen.
 |
| 54 |
55. Weave through the tila.
 |
| 55 |
56. Pick up 1 tila and bring it next to the previous tila.
 |
| 56 |
57. Pass through the end holes of both tilas. Pull your thread.
 |
| 57 |
58. Pick up another tila and bring it next to the tila your thread is coming out from.
 |
| 58 |
59. Pass through all 3 tilas, going through the first holes near the 4MM bead, then back through the end holes
 |
| 59a |
 |
| 59b |
60. Pick up 3 copper 11/0 beads; pass through the tila bar going through the first holes.
 |
| 60 |
61. Pick up another 3 copper 11/0 beads; pass through the end holes of the tila bar and through the first strung copper 11/0 from Step 60.
 |
| 61 |
62. Skip over the center copper 11/0 added in Step 60; pass through the end copper 11/0 on this side, through the tila bar and the copper 11/0 on the opposite side of the bar. Repeat this step for the other side of the bar. Weave through the bar and your bracelet, tying 2 to 3 half hitch knots to secure your thread and cut your thread.
 |
| 62 |
Beaded Ring
63. You will need at least a 2 1/2 to 3 foot thread for this part. If you don't have a long enough tail thread, end it and tie in a new piece. Repeat steps 51-53 for this end. Pick up about 23 copper 11/0 beads; pass through the 4MM bead to create a loop.
 |
| 63 |
64. Pass through all 11/0s and the 4MM bead again to strengthen this loop. Test your toggle end to make sure it goes through the ring.
 |
| 64 |
65. Weave through the 4MM bead, then pass through the first 2 copper 11/0 beads in the ring.
 |
| 65 |
66. Pick up 3 copper 15/0 beads and bring your needle through the 2nd and 3rd bead in the ring. This will form a small loop over the second copper 11/0 in the ring.
 |
| 66 |
67. Pick up 2 copper 15/0s; pass through the last strung 15/0 from the previous loop and through the 3rd and 4th copper 11/0 beads in the ring. This will create a small beaded loop over the third copper 11/0 in the ring and you will have shared a 15/0 from the previous embellishment loop.
 |
| 67 |
68. Pick up 2 more copper 15/0s; pass through the last strung copper 15/0 from the previous step and the 4th and 5th copper 11/0 beads in the ring. Continue adding 15/0s in this manner around the ring until you reach the 2nd to last copper 11/0 in the ring.
 |
| 68 |
69. Add your last 2 copper 15/os to the 2nd to last copper 11/0 in the ring; pass through the next copper 11/0 and the 4MM bead. Weave through the ring or your piece and tie 2-3 half hitch knots to secure your thread and cut your thread.
 |
| 69 |
Please feel free to leave a comment if you have any questions.
Connect with me


No comments:
Post a Comment