


 In this second post of the Candle Carving series, I will explain the bare essentials needed to get started with Cut and Curl candles. *Disclaimer: I am NOT an expert and this may not work for everyone, but hopefully it will help some of you who are interested in this intriguing medium. I'll be continually adding to these posts as I go along.
If you are the type to just jump in, by all means go for it! Kits are available online and would probably be the fastest and easiest way to get started. Candlefun has two fairly comprehensive packages that include wax, dipping wells, DVDs, carving wrack, pigment, along with some other options available on their site. Although I didn't see kits on this next site, Candles and Supplies also offer training DVDs, carving tools and wax.
On the other hand, if you are like me, you can start small, simple and cheap. I'm the type of person that will use what's available and figure out a way to make it work. I have a hard time buying a whole bunch of expensive equipment and supplies, just to decide it's not for me later. There are a couple of drawbacks with my method though. I'm sure it would have been an easier experience to start out with the right materials. I do like to think that I have a little more appreciation for my supply purchases now as I understand why that particular item is needed. Some things just don't have a work around or can't be done cheaply. As I explained in a previous post, I tend to cycle through endeavors, so I try to keep expenses down as much as possible until it really starts to take traction.
I'm going to show you what I started with and what I am currently using. I'll also share the mistakes I've learned from, and pros and cons to some of the "work around" supplies.
Wax
You will need some good cut and curl wax. In my first post of the series, I listed some online resources, along with details on what to look for.
Dipping Containers

If you want to purchase containers designed for candle dipping, Candle Chem Website (or their Ebay store) and Peak Candles sell dipping vats online that are priced about $20 and up, not including shipping costs. Candlefun sells a portable wax melting system and may be worth the cost it if you are looking for a way to make your candles at an event.
To start though, you can just use what you have and upgrade later. Some DIY ideas for containers are: metal coffee cans, tin cans, metal buckets, cleaned out paint and lacquer thinner cans (big ones), pots, and tall cookie metal containers. Be creative with this! Test your empty container in the water before putting in wax to make sure is 100% sealed and water won't seep in.
Keep in mind the larger diameter of the container, the more wax it will take to fill up, and the bigger the pot you'll need for the double boiler. It's better to use a taller versus a wider container, but don't go to small around as candle layers tend to build up quickly and you want to be able to dip your candle. Also, wax is difficult to remove, so once you dedicate a container for candle making, there's almost no going back. Use old containers or something you don't mind getting wax in.
 The first few days I started in an old baking pan filled half way with water and the two tin cans of wax. I had about a pound of wax at the time. The cans eventually will rust, but this is a great way to start out if you have limited resources. Obviously, you will have a limitation on the size candles you can make with this set up, and most commercial star molds won't fit the cans. I did create a cardboard mold for this size and I'll explain it in a little further detail in the next section.
 |
| January 11 |
I upgraded to the 3 lb family size tall green bean cans by the end of my first week, along with a big pot I purchased at a thrift store. They are a lot taller and can handle almost up to a 5 inch candle. They take about 2- 2 1/2 pounds of wax a piece. I also got a four pound capacity pouring pot (Michaels and Hobby Lobby should have them--present their online mobile coupon at the checkout!) that can be doubled as a dipping container as well. Right now I just keep my clear wax in it.
 |
| January 29 |
 |
| February 25 |
Pros for using your own containers: Cost effective, will be usable for a while, cans are easy to obtain.
Cons: Size limitations, rusting, will have to be replaced, may have to deal with leaks.
Candle Mold and Core Candles
 Another candle carving essential is a star candle mold and these come in a variety of shapes and sizes. They are used to make the core candles, and I will go into details on my next post on how to make cores. The most common molds available in the U.S are metal, but there are some silicone ones out there. The amount of star points is a matter of preference. They come in a range of 5 points up to 10 to 12 (or more), but I think the most widely used are 5 to 8 point stars because there is enough space in between each point to work your design and cuts. You'll probably want to start with a 6 point but One Stop Candle suggests beginning with a 5 point star so you have time to make all of your cuts. Either one will work; I just like even numbers since a lot of designs are done in pairs.
 Another design option for star molds are tapered (wider at the bottom than the top) and straight (same dimensions for the top and base). Again, this is a matter of preference. According to One Stop, they say most candle makers use the straight design, and that's probably the easier of the two to work with. The tapered can give a nice effect though, especially for taller candles.
 Height is another option to consider when making your purchase. If I could have a do over, I'd probably get a 6 inch pointed mold and buy my taller one later. As I mentioned earlier, if you are using your own containers, you'll probably be confined to just doing 4 inch tall candles and less wick will be wasted on a smaller mold. If you are unfamiliar with using molds, they are essentially upside down. The top of the candle wick is threaded through the bottom hole and the remainder of the wick is brought up through the mold. A stick or wick holder is used at the top to hold the wick in place. Once the candle has hardened, the excess wick is cut from the bottom (more details in the next post).
Molds can be found online and vary in pricing. Here's a short list of suppliers that I found:
Candles and Supplies- This is where I got my tapered mold from.
Candle Chem
Lone Star
Peak Candle
Ebay
Amazon
 When I started searching for a mold, none of the nearby stores had them and I was too impatient to wait for one to be shipped. I was also working with pretty small dipping containers, so I made a cardboard star mold. I'll go over briefly how I did it and some of the pros and cons of making your own mold.
This first cardboard mold was created from a pizza box that was cut to about 4 inches wide and marked at 1/2" intervals. The lines were scored, then the box was folded back and forth on the lines like a fan. Depending how many points you want is how many folds you make. 5 points need 10 folds plus an additional one to glue to the first fold. I glued the ends together, paper clipped to hold while the glue set, and hot glued the crap out of the bottom to another piece of board for the base (see Make Life Lovely's toilet paper roll mold) and along the connecting seal.

A little bit of warning-the cardboard molds are a bit of a pain to use, but they can be reusable. The wax will need to be cold to come out. I used a very small knitting needle down the edges to help pry it out, and had to flip it upside down and give it some love taps on the counter. Also, don't expect perfect wax molds from these. This is just a cost effective way to get you started or something to use while you wait for your molds to be shipped :)
If you've never used a candle mold or made a core candle before, I'll cover how to make one in my third post of the candle carving series.
Pros for using a handmade cardboard mold: Can use materials around the house, reusable to an extent, can make multiple ones, inexpensive, ability to make custom sizes.
Cons: Difficult to get out, can leak, won't produce a "perfect" mold, uses A LOT of hot glue.
Wick

CandleScience: How to Conduct a Basic Burn Test
CandleWic: Why Do You Need to Pick The Right Candle Wicks?

Rustic Escentuals
Keep in mind the above sites explain how to do tests for containers and pillars, so you'll have to modify this based on what your end goal is. I wanted to be able to fit a 1/2" diameter votive or tea light in mine.
I began with using some twisted cotton twine I had lying around, and I am finding out through my burn tests that it's too big for both of my molds, but it has been great to practice on. As you can see to the right, the melt pool (diameter and depth of the of the melted wax around the burning wick) was too large and I don't want the finished candles to burn holes at the top like this.


My final verdict is the 15 ply, which will work with both molds. The 2.5" wide
tapered candle can burn for about 30 minutes at a time and the 3" wide will be fine for about an hour to an 1 1/2 hours with this wick. I wanted to make a well around the wick, so every 30 minutes (or 1 and 1/2 hours for the 3"), I dump out the melted wax, shape the well with my fingers while it's warm and pliable, then relight.
Pros for using your own wick: If you already have it, cheap to use, great to experiment with, can still carve candles.
Cons: Regular wick is fairly inexpensive so may not be worth the trouble, may not burn properly.
For the remainder of the materials list, they are fairly self explanatory so I won't go into too much detail about each of them. I've also added some optional supplies that have been helpful to me, but aren't really necessary to get started.
Carving Tools and Misc.

Scissors- Cutting the wick.
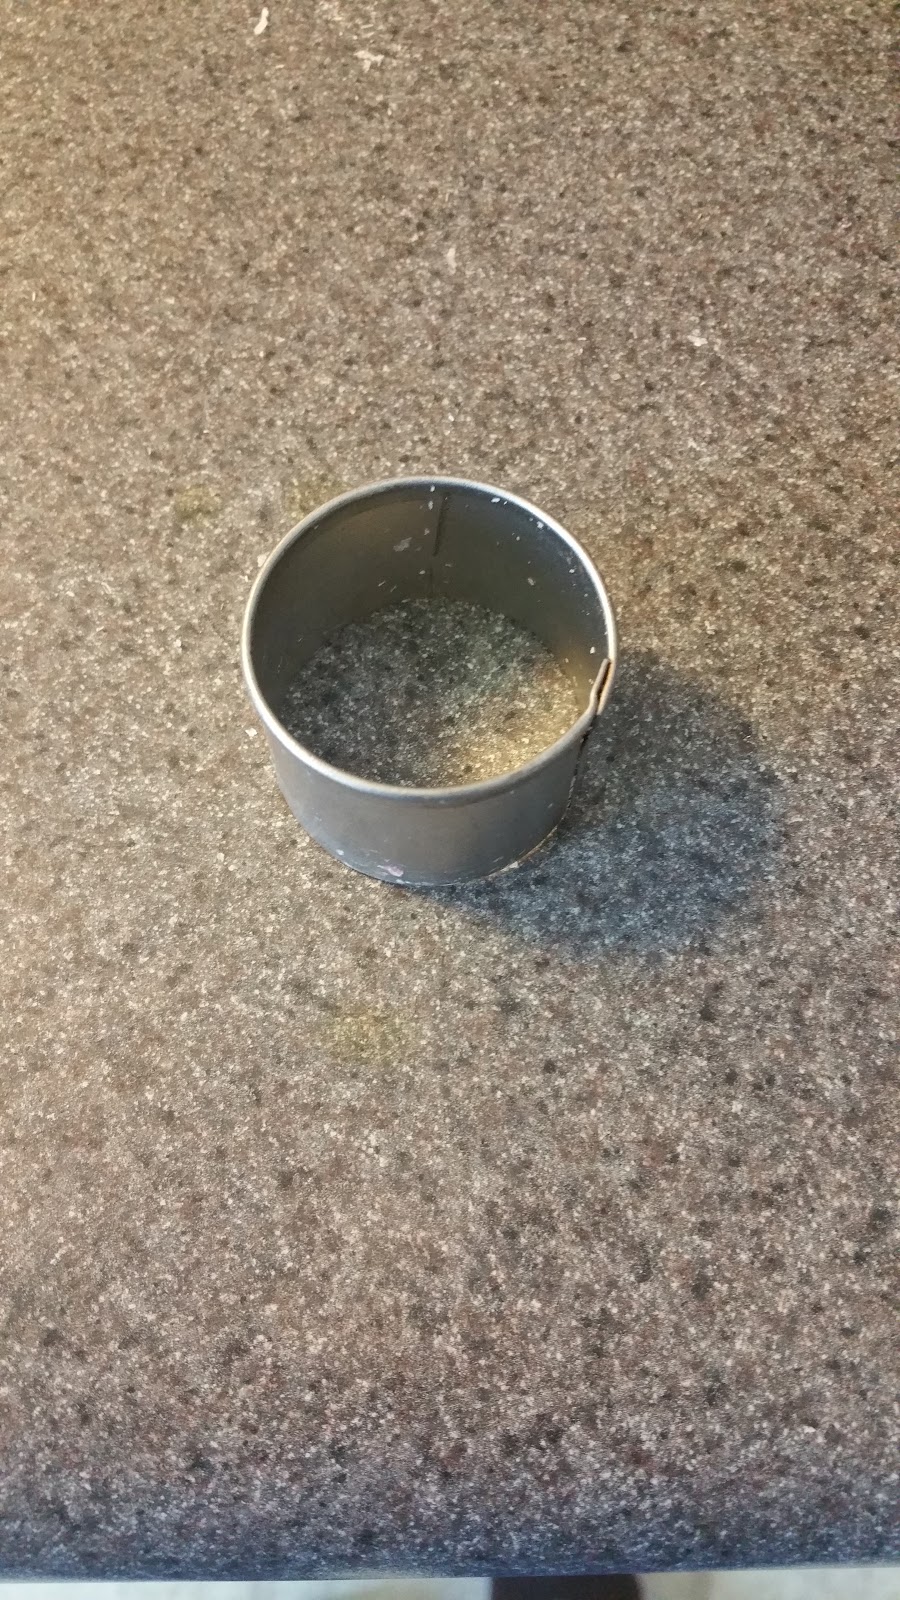
Cap with a hole or a small 1 and 1/2" diameter, round cookie cutter (optional)- Used to make a circular cut to help start a well around the wick. The cookie cutter is better to use as it's sharper, but a cap will do in a pinch. You also can just use a knife, but using a round object will make it look a little neater. This really won't been needed until you start making pigmented candles, or want to burn them.
Router blade (optional)- A ribbon pottery tool will also work. This is used to make the spiral cuts in the crevices of the candle. It can be found in the pottery section of craft stores. Mine's a little small and works great for my little candles.

Wick Holder -Something to hold the wick up straight while the core candle is setting. I use a shortened skewer.
.
Mold Sealer/Plug- Used to plug the bottom of the mold to prevent leaks.

Stir sticks- Once you start mixing color, these will come in handy. Again, you can use what you have; mine are wooden skewers.
Sharp blade (optional)- I use mine to clean up counter and floors. Just be careful not to nick anything.
 Paper clip or S hook and someplace to hang a candle- It might be a good idea to
go ahead a splurge on an s hook or something sturdy to hang your candle with. I haven't run into any problems with my paper clip hook yet, but it's probably just a matter of time. I use my cabinet door to hang my candle on.
 Small paint brush (optional)- Used to brush off small crumbs off of the candle and in crevices.
Small knitting needle (optional)- I used this to help pry out the candles out of the cardboard molds. You won't need it with a regular mold.

Heat Source- Probably the most obvious one that I almost forgot to include. I use my stove and a portable burner that I bought a while back for pretty cheap.
So there's the basics needed to get you on your way to carving candles. Arguably, pigment could be added to this list, but you can begin to carve candles with out it. I started with clear wax, practiced carving and remelted projects until I felt my cuts were somewhat decent, then worked with color. I'll cover color pigment in another post, but in my next one, I'll discuss how to make a core candle.
Please feel free to add anything I may have missed or share your expertise!
Previous Post: Part One Next Post: Part Three
Connect with me


No comments:
Post a Comment