


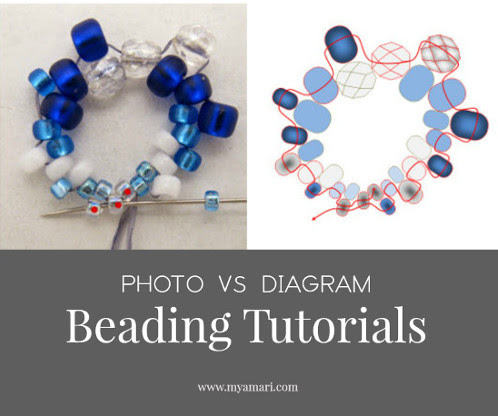
In this post, I would like to discuss a few pros and cons of bead diagrams and photos that I've personally run into, and hopefully help those of you who are considering making your own. There are other ways, such as video tutorials, but my focus here will be on these two methods.
I've been writing step by step photo bead patterns for the past four years. Here's an example. When I first began beading B.P. (Before Pinterest), I had a difficult time finding clear instructions on the internet. There was a lot of guessing and ripping bead projects apart, which is a normal part of the learning process, but it was frustrating because I felt I wasn't getting anywhere.
A little later, I ran across Deb Roberti's Around the Beading Table site and found her patterns to be extremely helpful. Her illustrations and instructions were written with such clarity that even a novice, such as myself, was able to understand how to complete her projects.
Once I began designing and writing my own tutorials, I decided that I wanted mine as straightforward as Deb's but I had no clue how she did her drawings, so I took photos. Lots and lots of photos. I wanted to fill that gap for other beaders that I had when I started. It's worked out pretty well so far, although there are times where the amount of photos I take for a single project are a little overwhelming.
The latest pattern I'm working on is for North Georgia's Bead Society Bead Retreat in August. As usual, I took all of the step by step photos, edited them (which is getting easier since it's done on my phone), inserted each photo in Presentations, and started writing.
 |
| Helen Bracelet |
After brushing up on Kassie Shaw's Bead Diagrams in Microsoft Word course, I started on some vector bead diagrams. 13 illustrations and 9 steps later, I was able to shorten that 4 page section into 2 and 1/2 pages, which brings me to my list of advantages and drawbacks I found with each method.
Where Vector Bead Diagrams Shine
Simplified Steps. Probably the biggest plus for me is that I can show multiple steps in one, and still keep it understandable. These top four photos show the first round in my Captured bracelet pattern.


Now here is the same round shown in one illustration.

Alternately, I could show the first and last photo, and most people would understand it as long as I was clear in the written part of the instructions. In this case, I like how the diagram shows all the beads added, where to start, and where to exit, in one step.
Easier to correct mistakes. This is another biggie and a real time saver. Since you can copy and paste diagrams, it's not as nerve wracking to go back and correct a mistake or missed step. With photos, if you mess up early on, you have to go alllll the way back and redo photos from that point on. I just counted how many pictures, not including some strays and finals, that I took for the current pattern. Any guesses? Between my beginning mess up, fixes, and middle redo, 379. *cough*
Consistency. Notice the background colors on the photos above? I went back to fix a step, and didn't have my settings and lighting exactly as I had previously. This was simply user error, and I'm sure if I was a better photographer with better equipment, proper lighting and a real camera, this could have been avoided. As it were, these were taken with a Samsung Note in a budget-diaper-light-box with light coming through only at the top. This isn't a huge deal as the steps are still obvious, but it's a little sloppy.
Other consistency issues I've run into time and time again are blurry images and inconsistent angles. I've gotten into a habit of double and triple checking, or even retaking images several times in case a step is not clear. Some photos still come out sub par and it drives the OCD in me nuts. As I move on to the next step, my angle may be slightly different. I don't have a camera stand, so it's all done free hand, so to speak.
Diagrams are just easier all around to keep consistent as they can be copied, pasted and built on to.
Easier to illustrate certain steps. There are times where you just can't photograph that little spot under a section, or at the proper angle. Diagrams get another win with this as (sometimes) it's easier just to draw it out.
A couple more pros off the top of my head are:
-Cleaner and more professional looking
-No light box and lighting set up
-Easier to enlarge without losing quality, if kept within the same program
-Depending on resources and experience, you can make things simpler or more complex as you wish
Although diagrams provide a good many benefits, don't toss the camera just yet. Not that you really would anyway. ;)
Where Photos Take the Cake
Now that I've highlighted some strengths about using diagrams, I'd like to point out the advantages of taking photos.
Photos look like the actual project themselves. Have you run across a diagram tutorial and thought, I'm lost, this isn't looking like my project? With photos, more than likely your project looks like it does in the tutorial as you bead along. Even when I'm doing illustrations, I like to throw in some photos to show what the piece is really supposed to be looking like at that particular point.

Can be easier to create and edit. I hesitate to make this a plus in the photo column because there was a learning curve for me with taking good photos. Lighting needs to be good and a certain way, camera needs to be decent, etc. Starting out though, and with zero knowledge of vector graphics, pictures were just the way to go and I learned as I went.
As I mentioned earlier, photos are now really quick for me to take and edit, especially for posts on Blogger. Take a photo, edit it on the phone, snag the image from Google Photos in Blogger, and insert into the posts.
With diagrams in blog posts, once they are created in Word, I have to make sure they are large enough, then copy and paste them into Gimp (a free and AWESOME alternative to Photoshop), crop, save it as JPEG or whatever file type, upload it into Photos then add to the blog. Whew. When it comes to a regular tutorial though, it's a simple copy and paste into Presentations.
Can be easier to show more complex designs. There times where I don't feel a diagram can convey fully what I need it to. Since I am just starting out with illustrations, I'm having difficulty showing dimensional work, which will probably come easier as I get better, but for now, I find photos easier to portray certain steps.

Conclusion
Both styles have advantages and disadvantages, and there's no right or wrong way here. It really boils down to preference, writing style, resources, and of course, audience. A couple of great questions to ask yourself as you design and put together your own patterns are, who is your audience, and how much experience will they have? Will they be able to clearly understand what you are trying to illustrate? Beginners (or anyone) who aren't familiar with certain stitches may need additional help, such as showing where the tail thread is, where the thread is coming out from, which bead exactly the needle is going into. And then there are some people who just can't understand diagrams. You won't be able to satisfy every single person who comes across your tutorial, but at least the majority will understand it.This definitely wasn't an exhaustive list of all the pros and cons, so feel free to comment anything you would like to add.
Connect with me


Resources:
Getting Started with Digital Beading Diagrams: How to Draw Your Own Bead Patterns in Adobe Illustrator by Cynthia Newcomer Daniel
Ready made vector beads on Etsy by Vector Beads
How to Make an Inexpensive Light Tent by Digital Photography School
Connect with me


No comments:
Post a Comment